OneDrive
OneDrive Connector
Indexes files from your personal OneDrive, including nested folders. Uses Microsoft Graph delta queries for efficient incremental sync.
Prerequisites - Before you start, make sure you have:
- A running Sercha instance (Quickstart or Development Setup)
- A Microsoft account with permission to register applications in Azure
1. Register an application in Azure
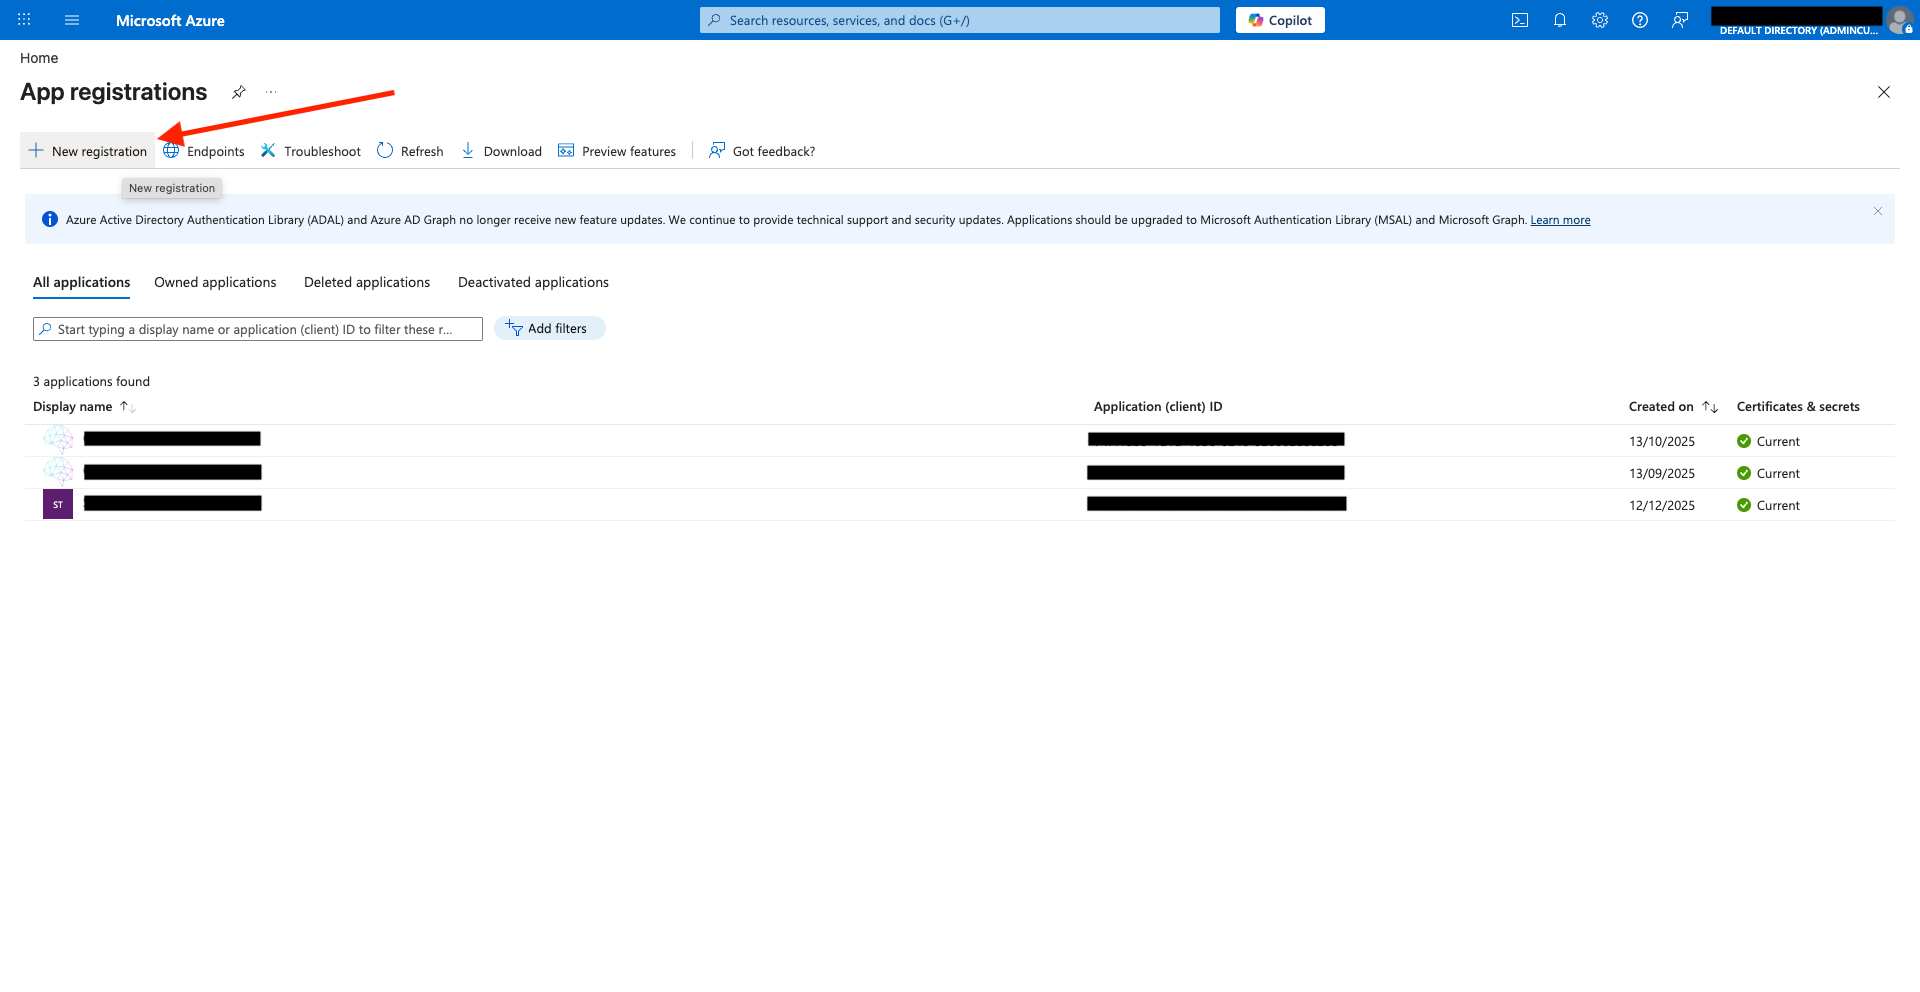
Open the Azure portal, then navigate to App registrations.
Click New registration.
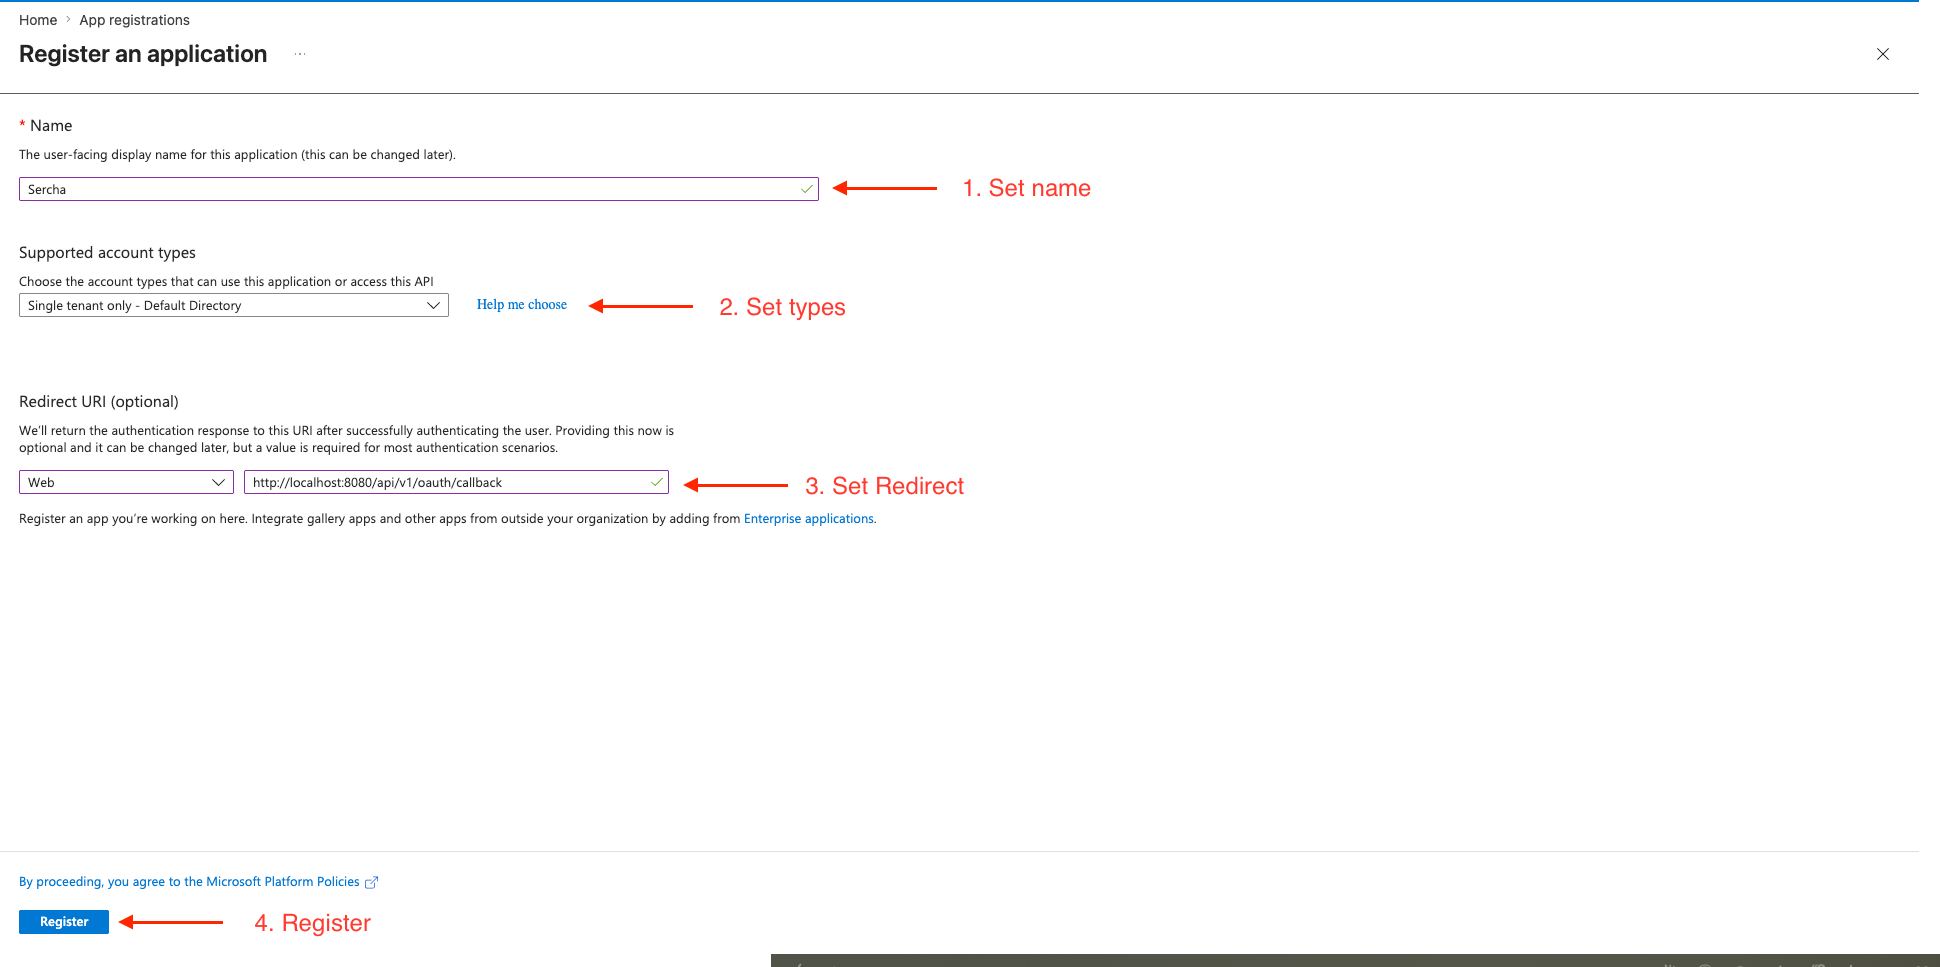
2. Fill in the registration details
Fill in the form:
| Field | Value |
|---|---|
| Name | Sercha (or any name you like) |
| Supported account types | Pick what suits your account. "Accounts in any organizational directory and personal Microsoft accounts" covers both work/school and personal. |
| Redirect URI (Web) | http://localhost:8080/api/v1/oauth/callback |
Click Register.
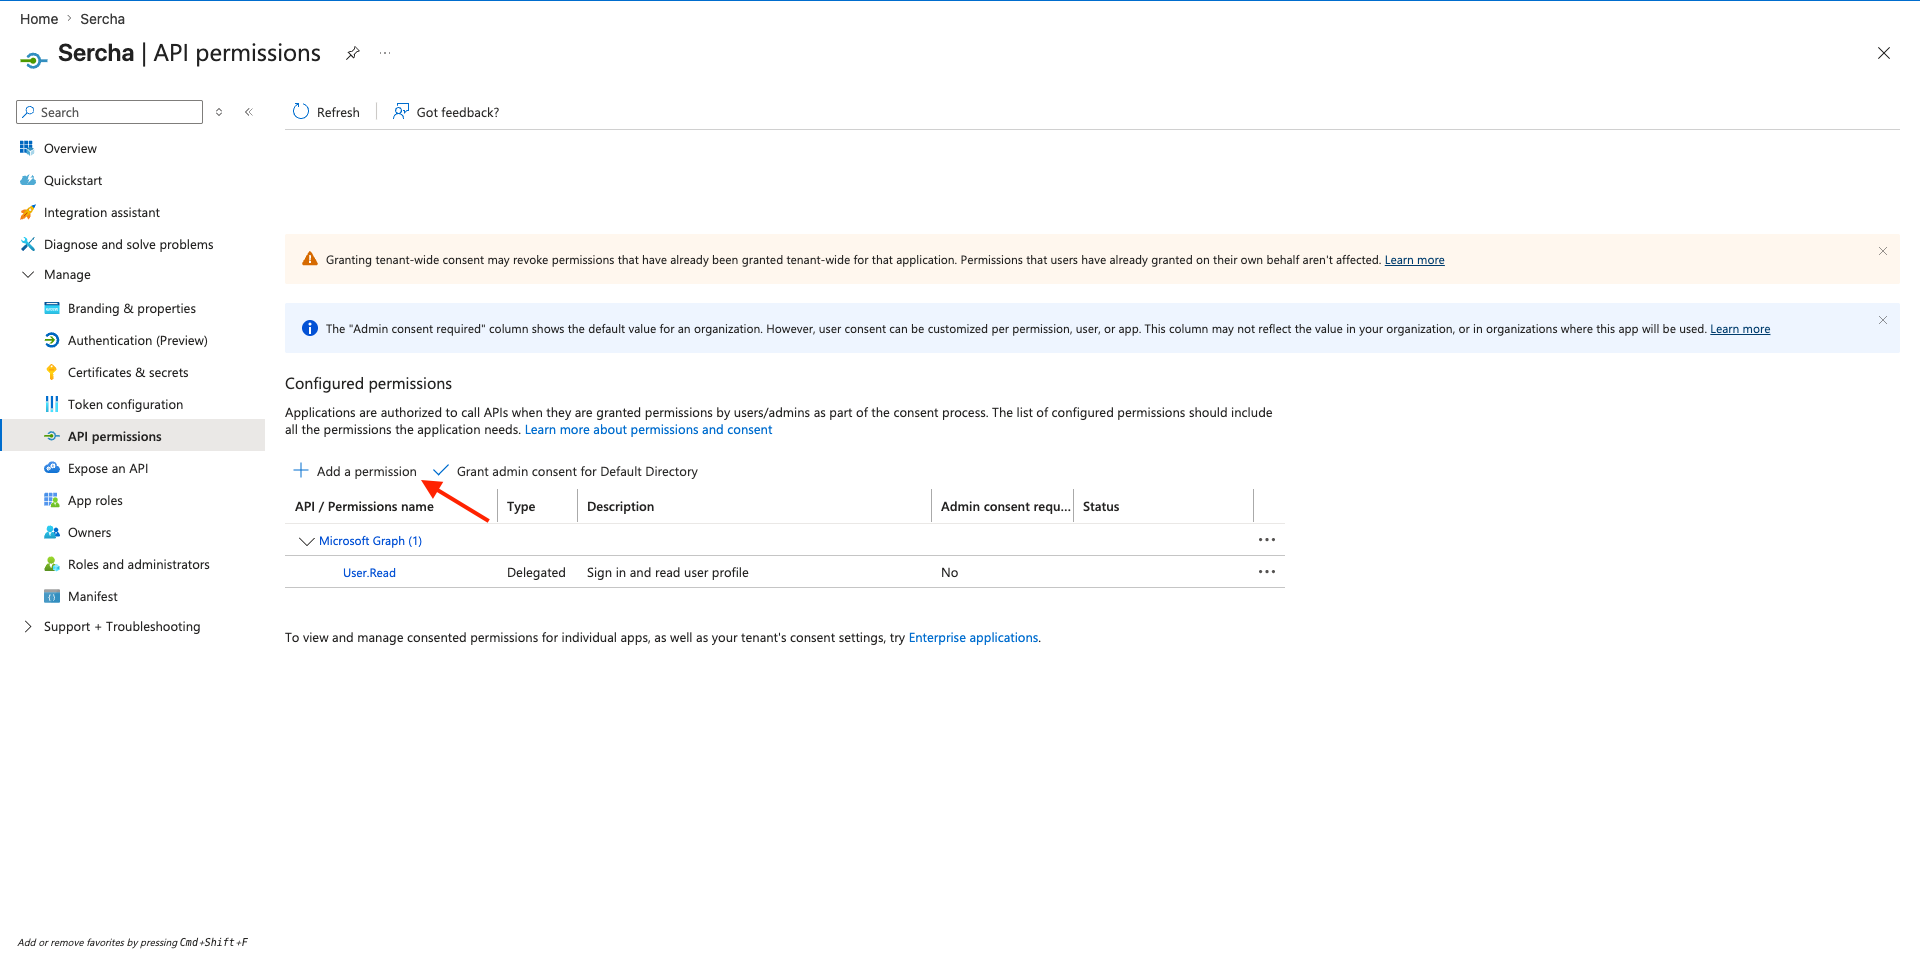
3. Add API permissions
In the app's left nav, go to API permissions, then click Add a permission.
Choose Microsoft Graph.
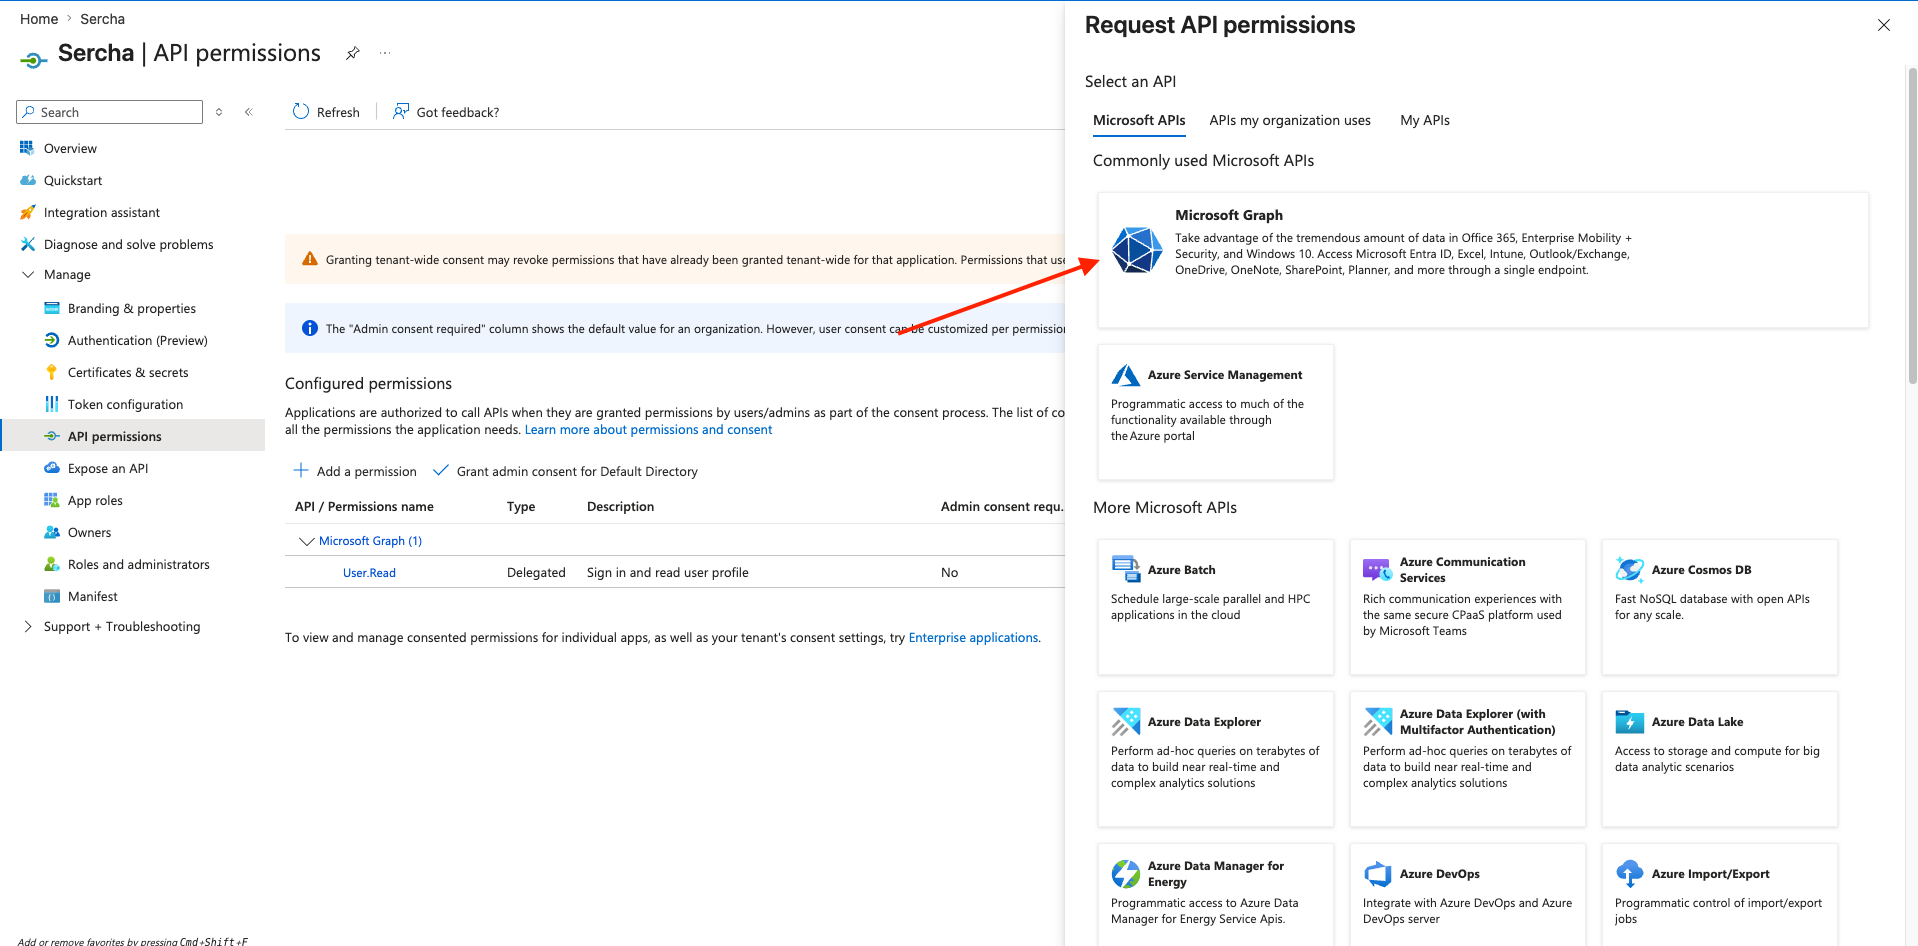
Choose Delegated permissions — the app acts on behalf of the signed-in user.
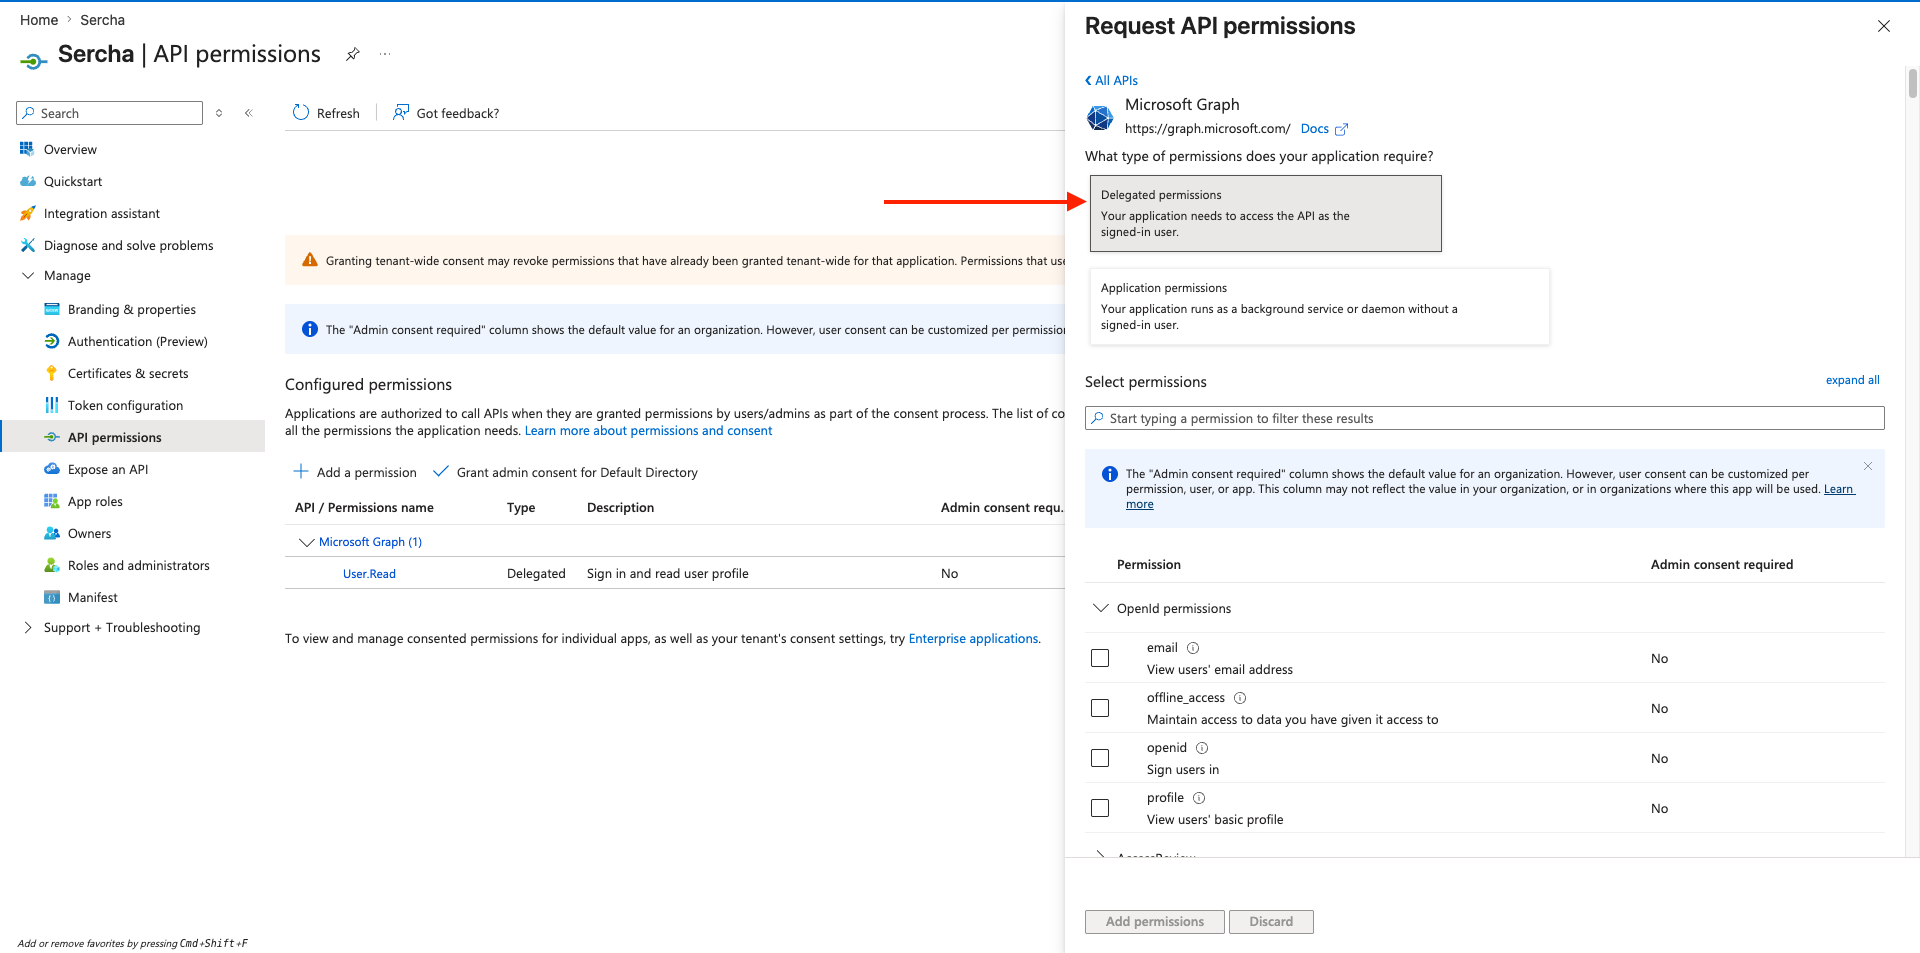
Use the search box to find and tick each of the three scopes Sercha needs, then click Add permissions:
Files.Read— read the signed-in user's filesUser.Read— read the user's profile (used to label the connection)offline_access— issue refresh tokens (required; Microsoft access tokens expire after 1 hour)
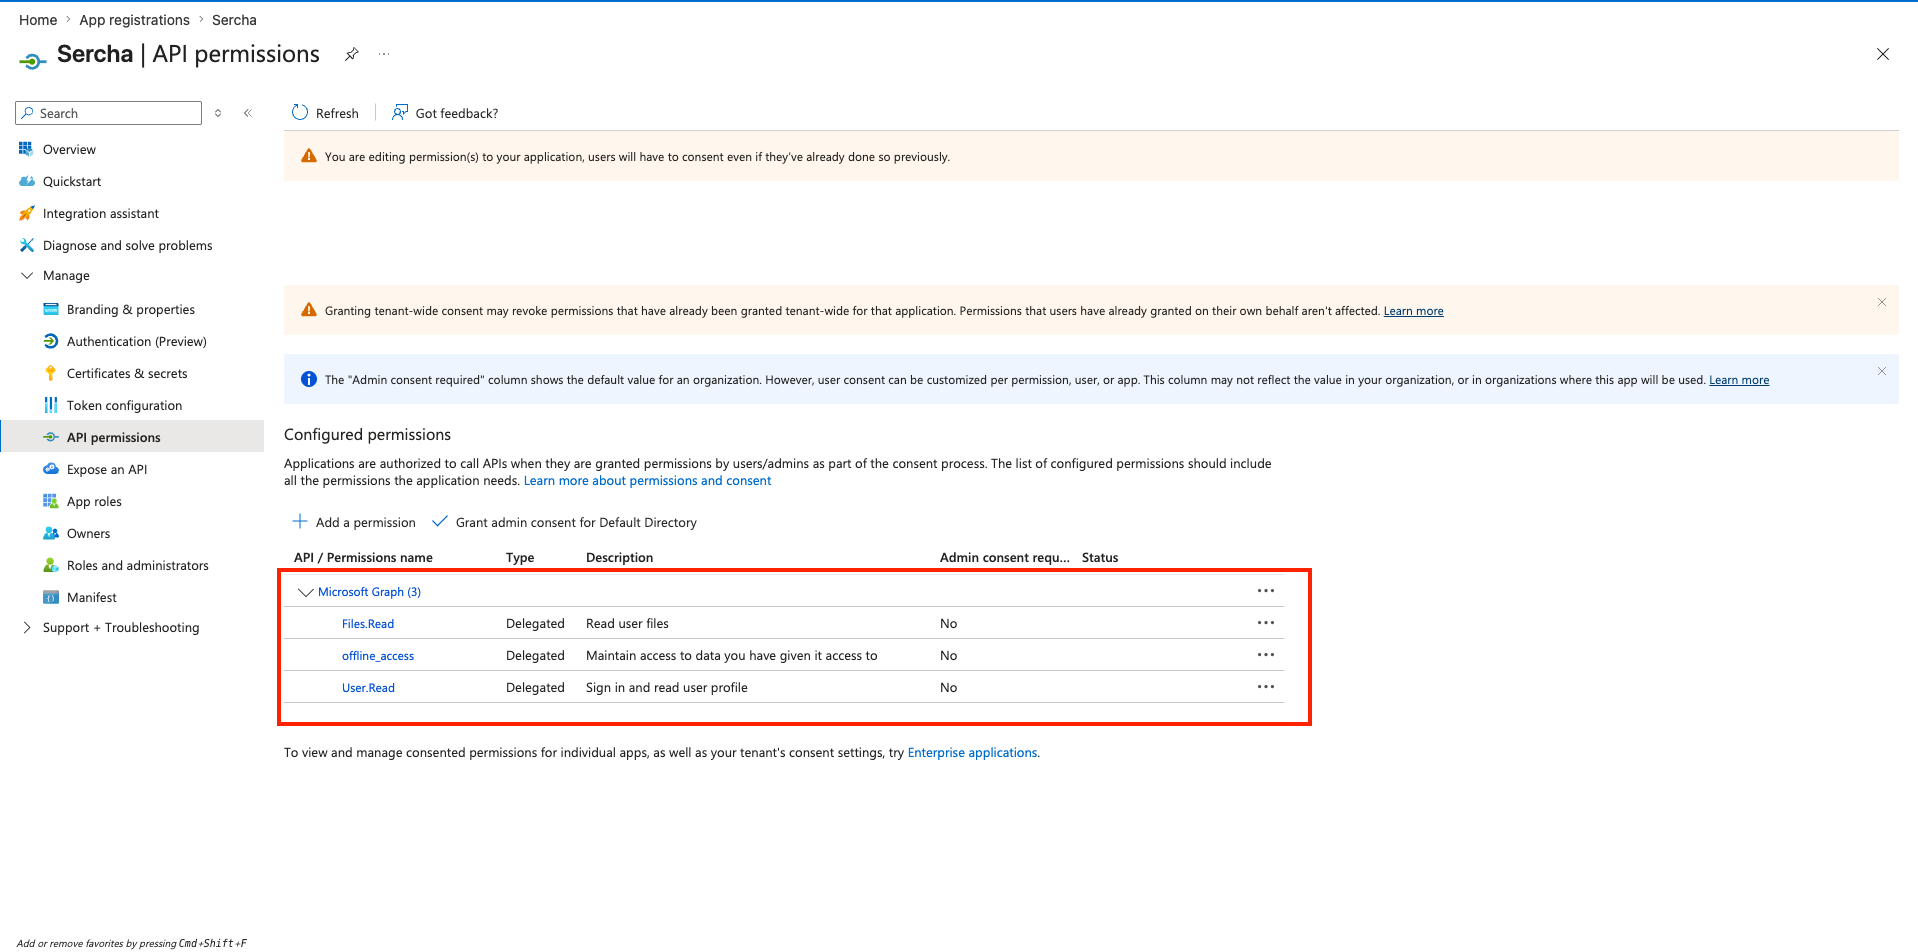
No admin consent is required for a personal Microsoft account. A work/school account may need admin approval depending on your tenant policy.
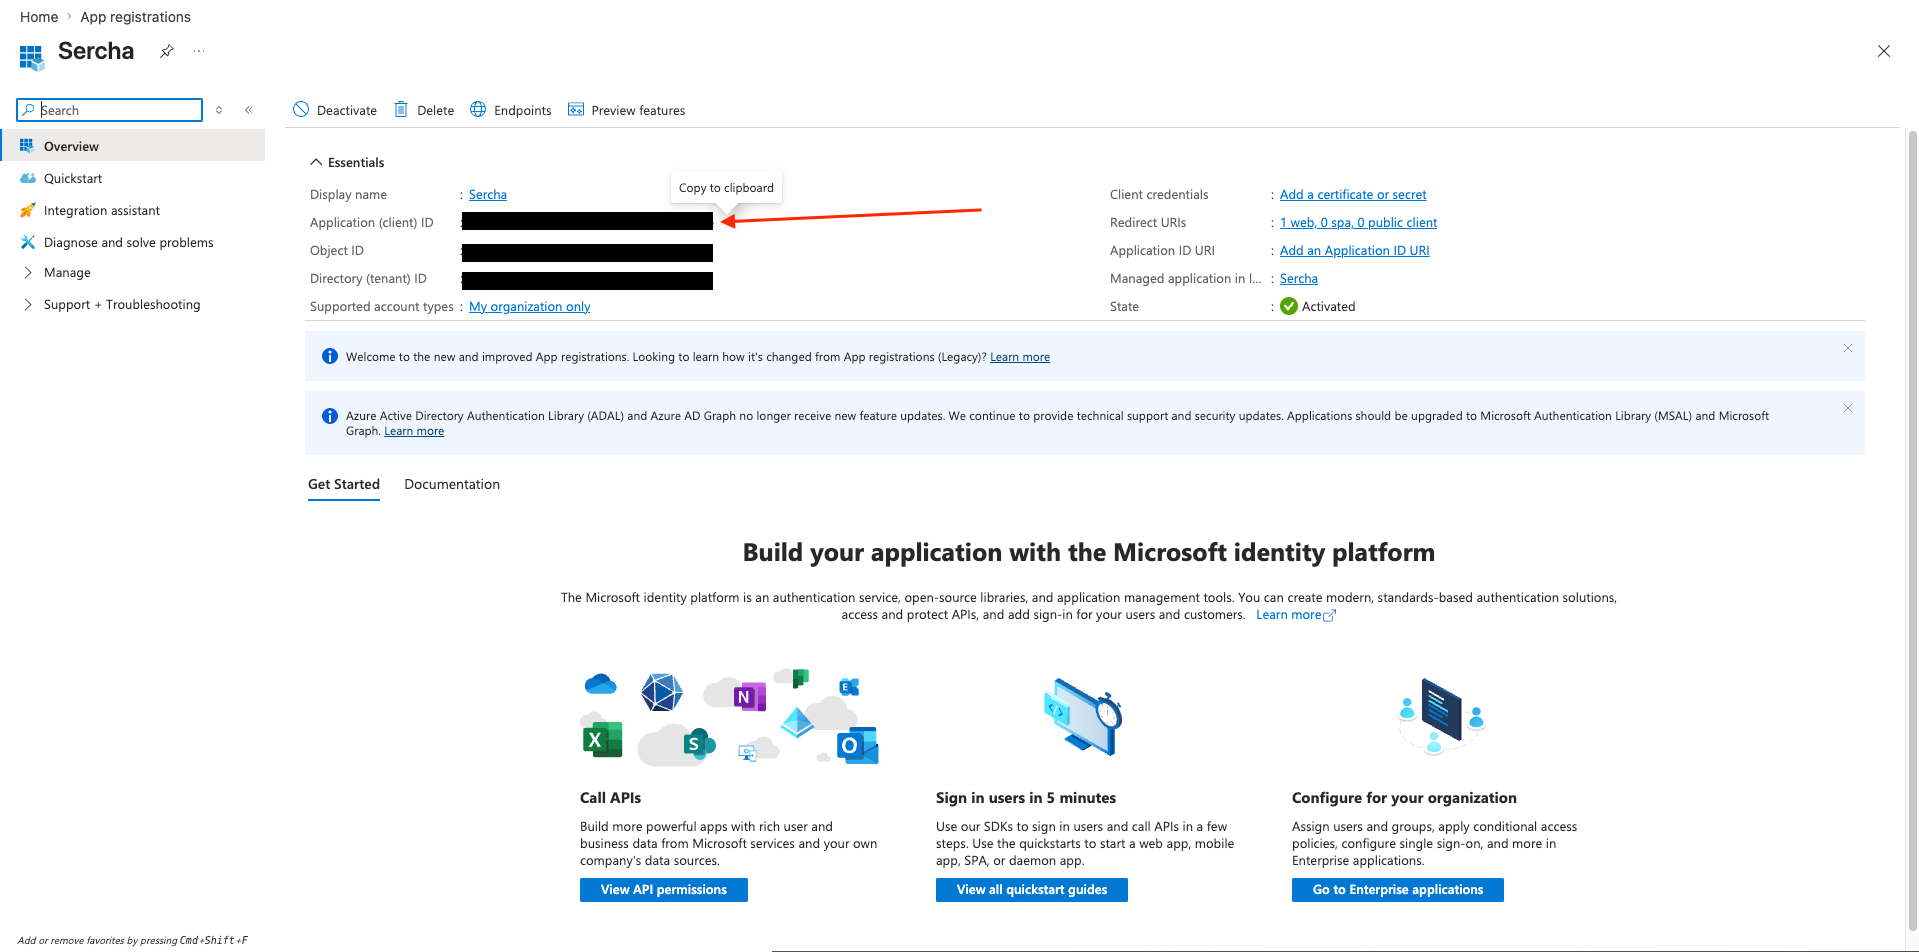
4. Copy the Application (client) ID
Go back to the app's Overview page and copy the Application (client) ID — this is the value Sercha uses as MICROSOFT_CLIENT_ID.
5. Generate a client secret
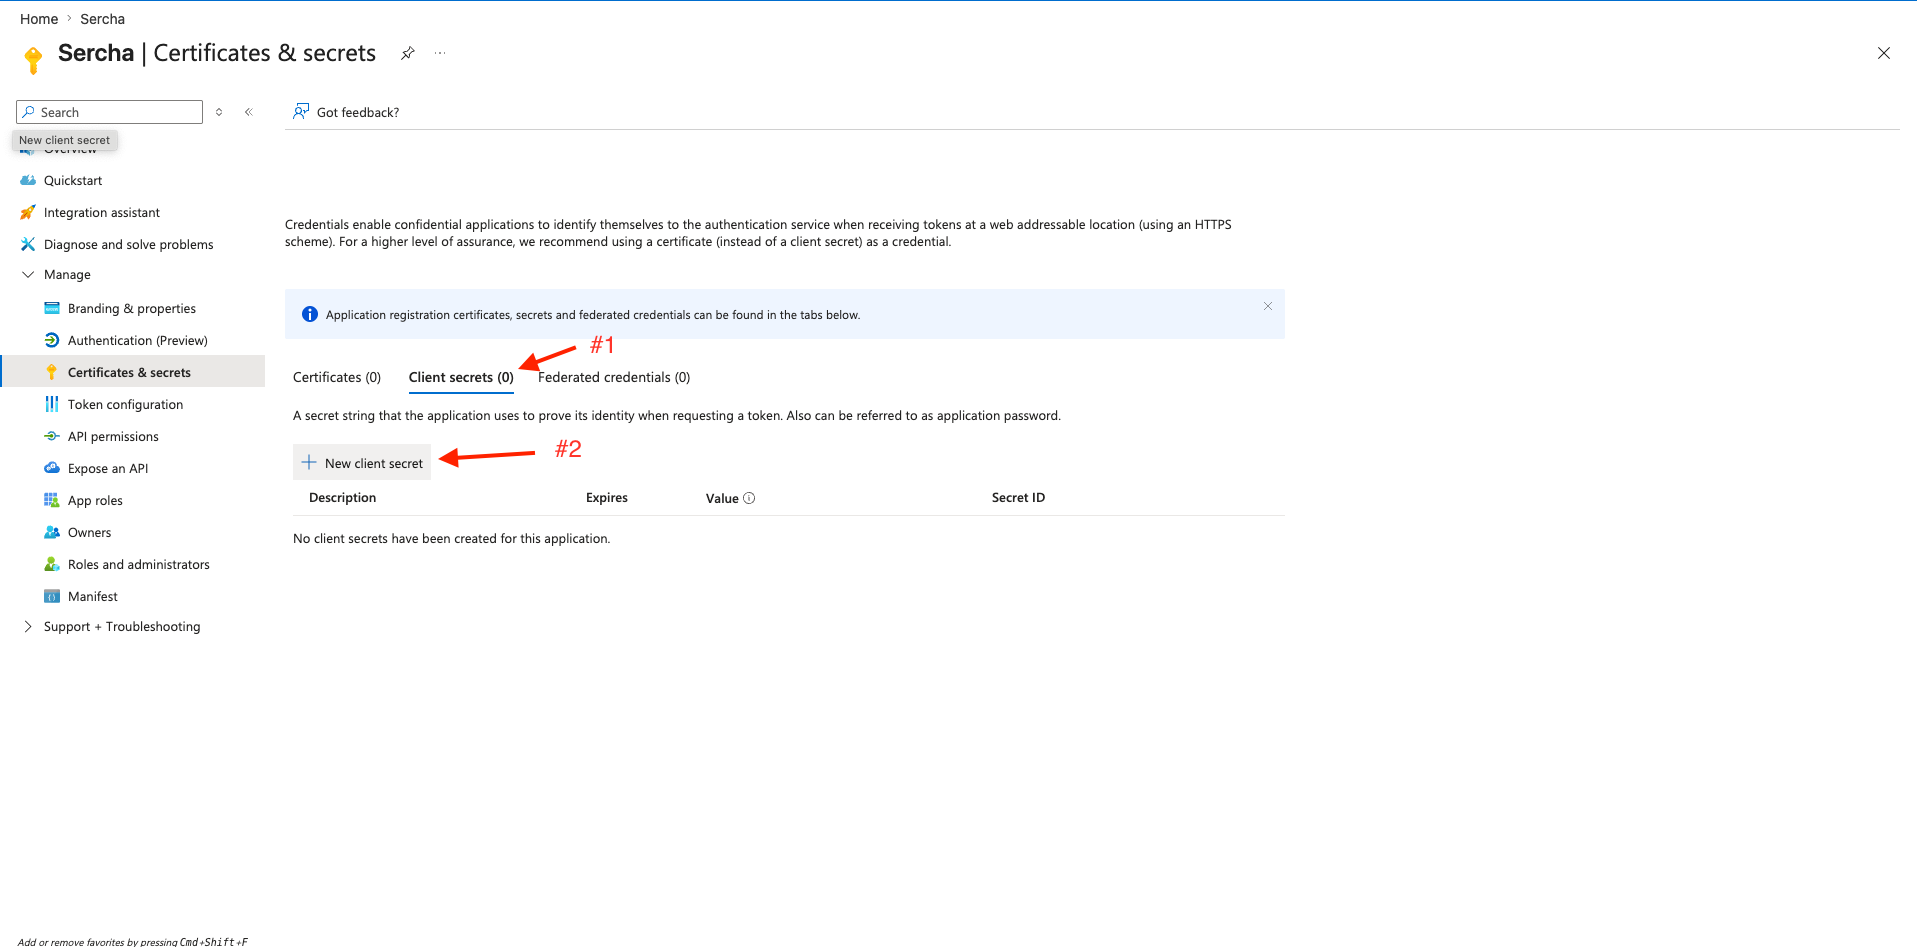
In the app's left nav, go to Certificates & secrets.
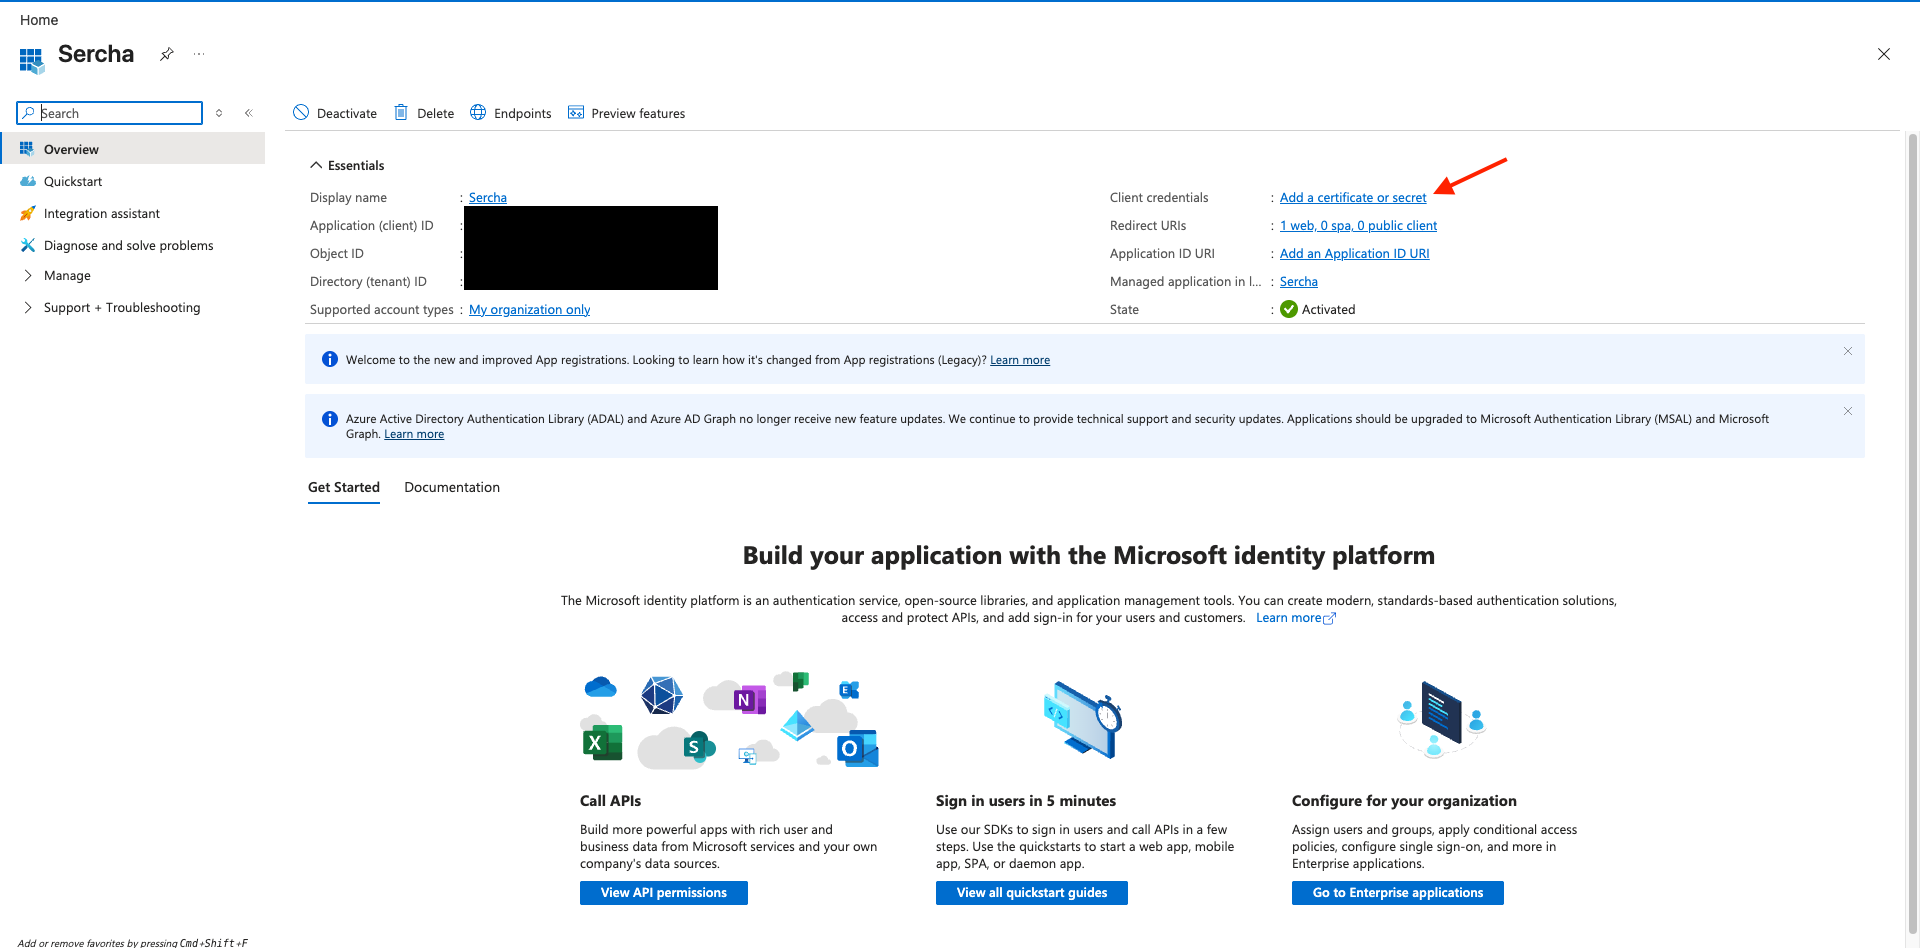
Click New client secret.
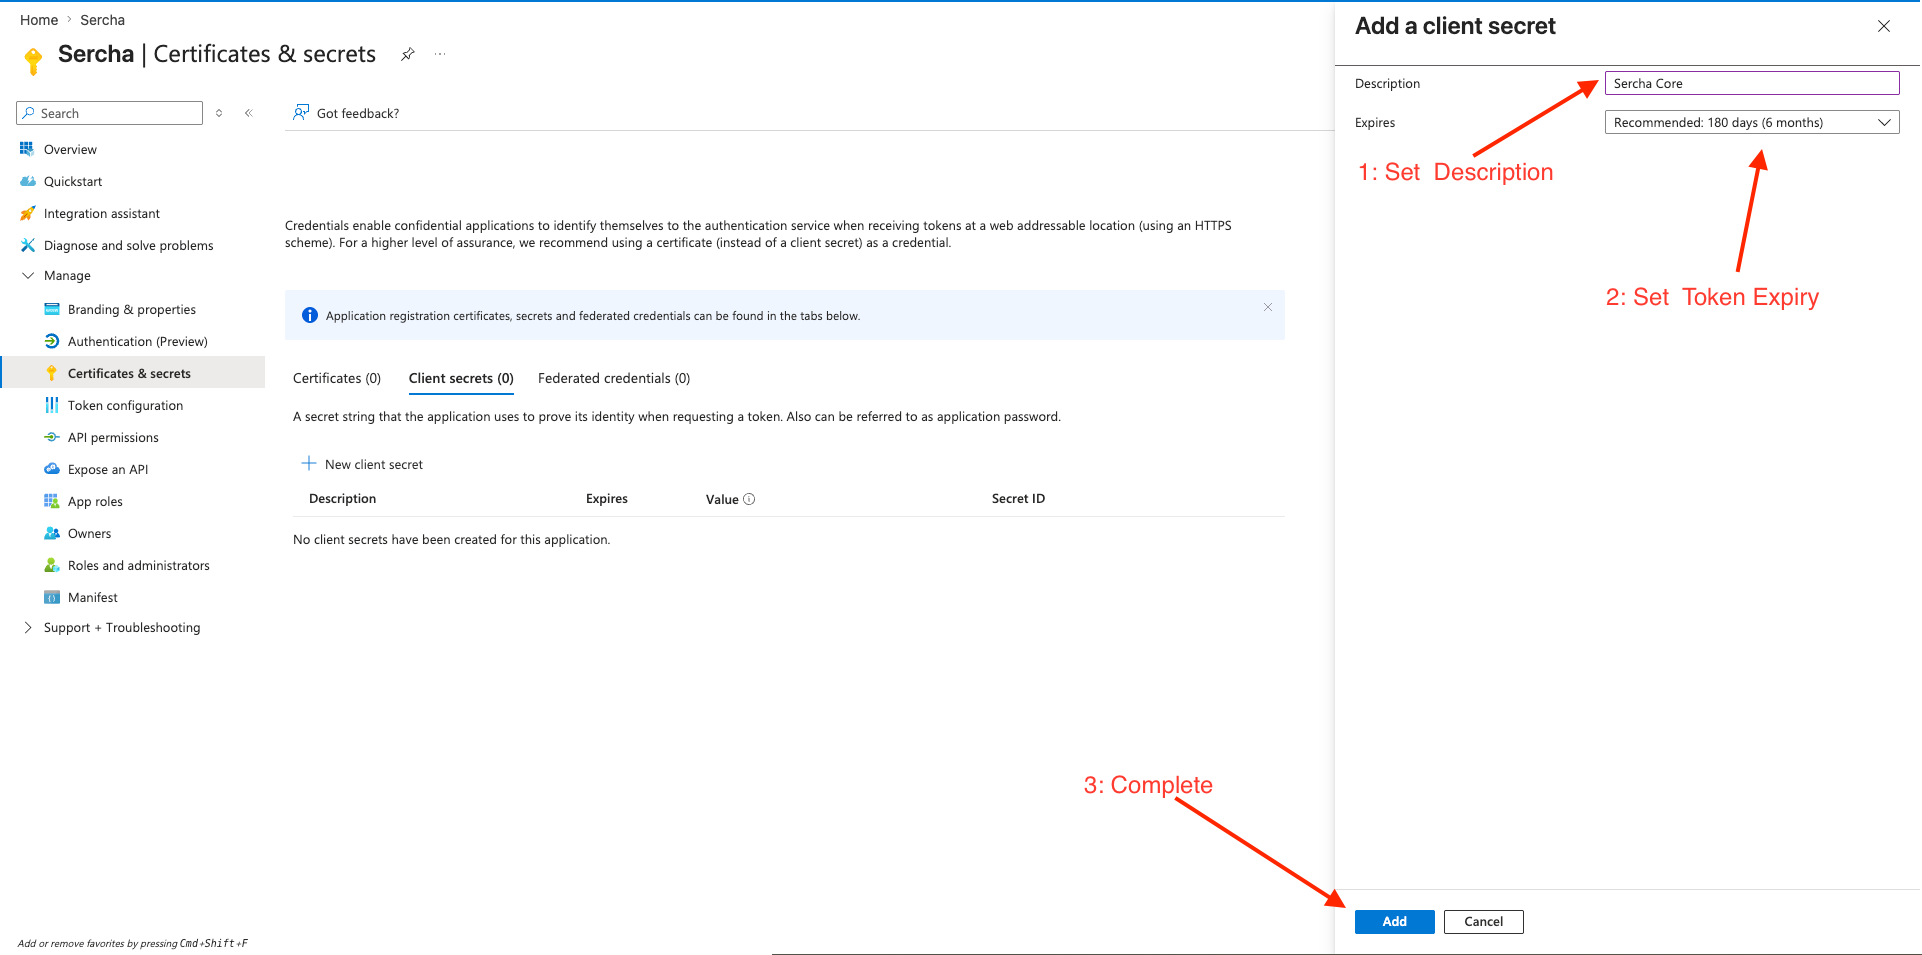
Give it a description (e.g. Sercha local) and pick an expiry. The default is fine. Click Add.
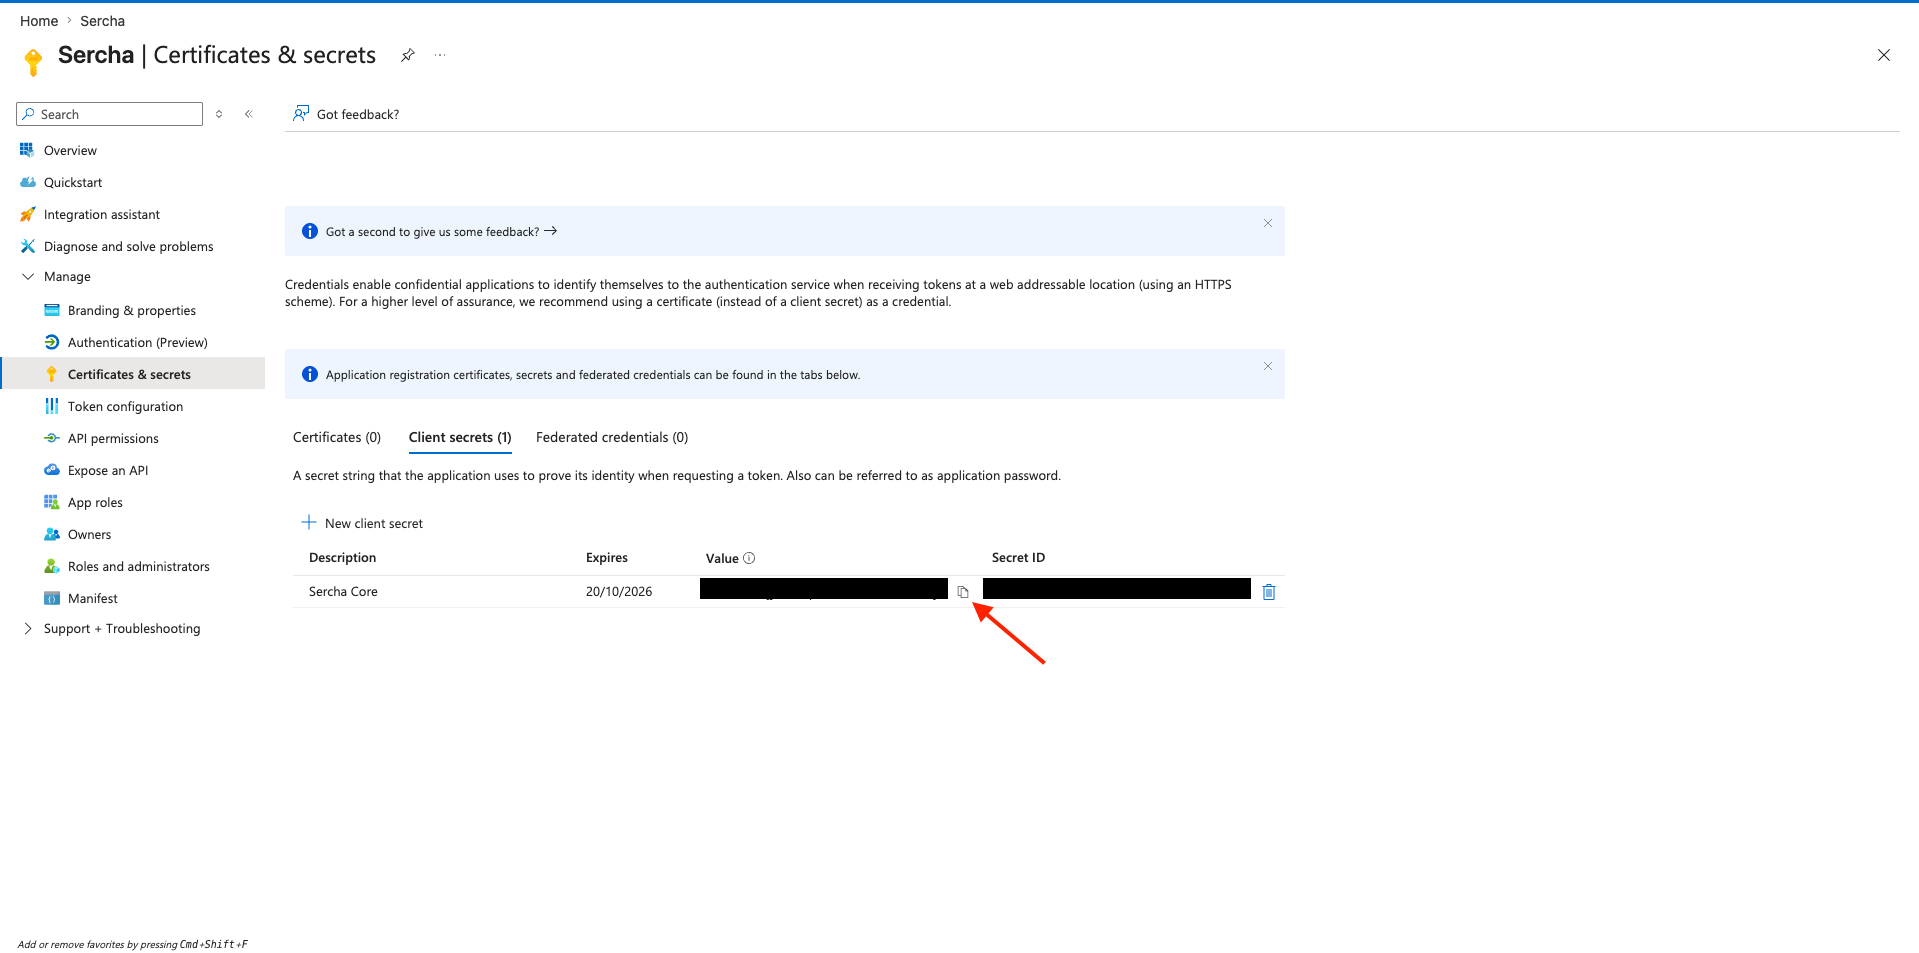
Copy the Value column now. Azure only shows it once — if you navigate away, you'll need to generate a new secret. Do not copy the "Secret ID" column.
6. Configure the provider
Add the credentials to your .env file (in your Sercha deployment directory):
MICROSOFT_CLIENT_ID=your_application_client_id
MICROSOFT_CLIENT_SECRET=your_client_secret_value
7. Restart the backend
Restart the backend container so it picks up the new credentials:
docker compose restart sercha-core
No data is lost when restarting. The backend containers are stateless - all data is persisted in PostgreSQL and OpenSearch.
You can verify the provider is configured via List Providers:
curl http://localhost:8080/api/v1/providers \
  -H "Authorization: Bearer $TOKEN"
OneDrive should show "configured": true, "enabled": true.
From here you can continue setup using either the Admin UI or the API.
- Admin UI
- API
8. Connect your OneDrive account
Open http://localhost:3000/admin/sources in your browser. You'll see OneDrive listed under the available providers. Click Connect on the OneDrive row.
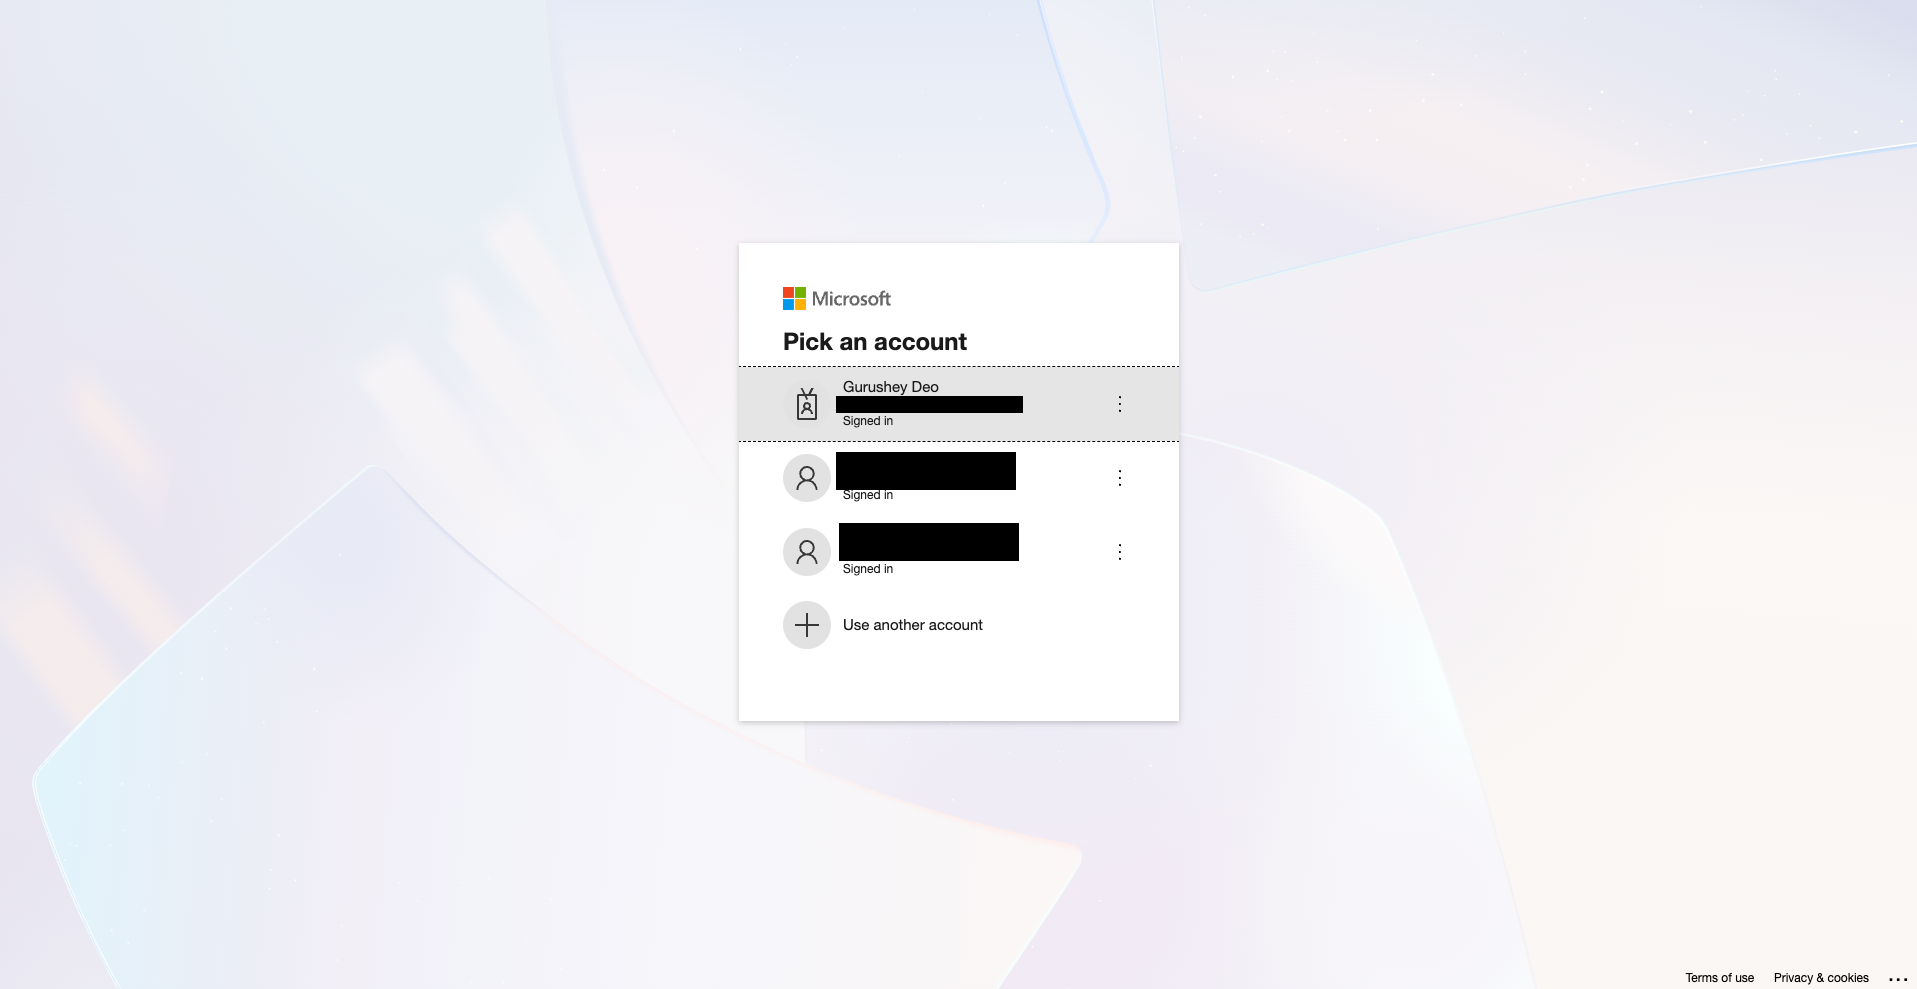
Your browser redirects to the Microsoft sign-in page. Pick the account whose OneDrive you want to index.
Review the requested permissions and click Accept. After authorizing, you'll be redirected back to Sercha.
9. Select folders and create a source
Choose which folders to index. Leave the selection empty to index all accessible content, or pick specific folders to narrow the scope. Then click Create Source.
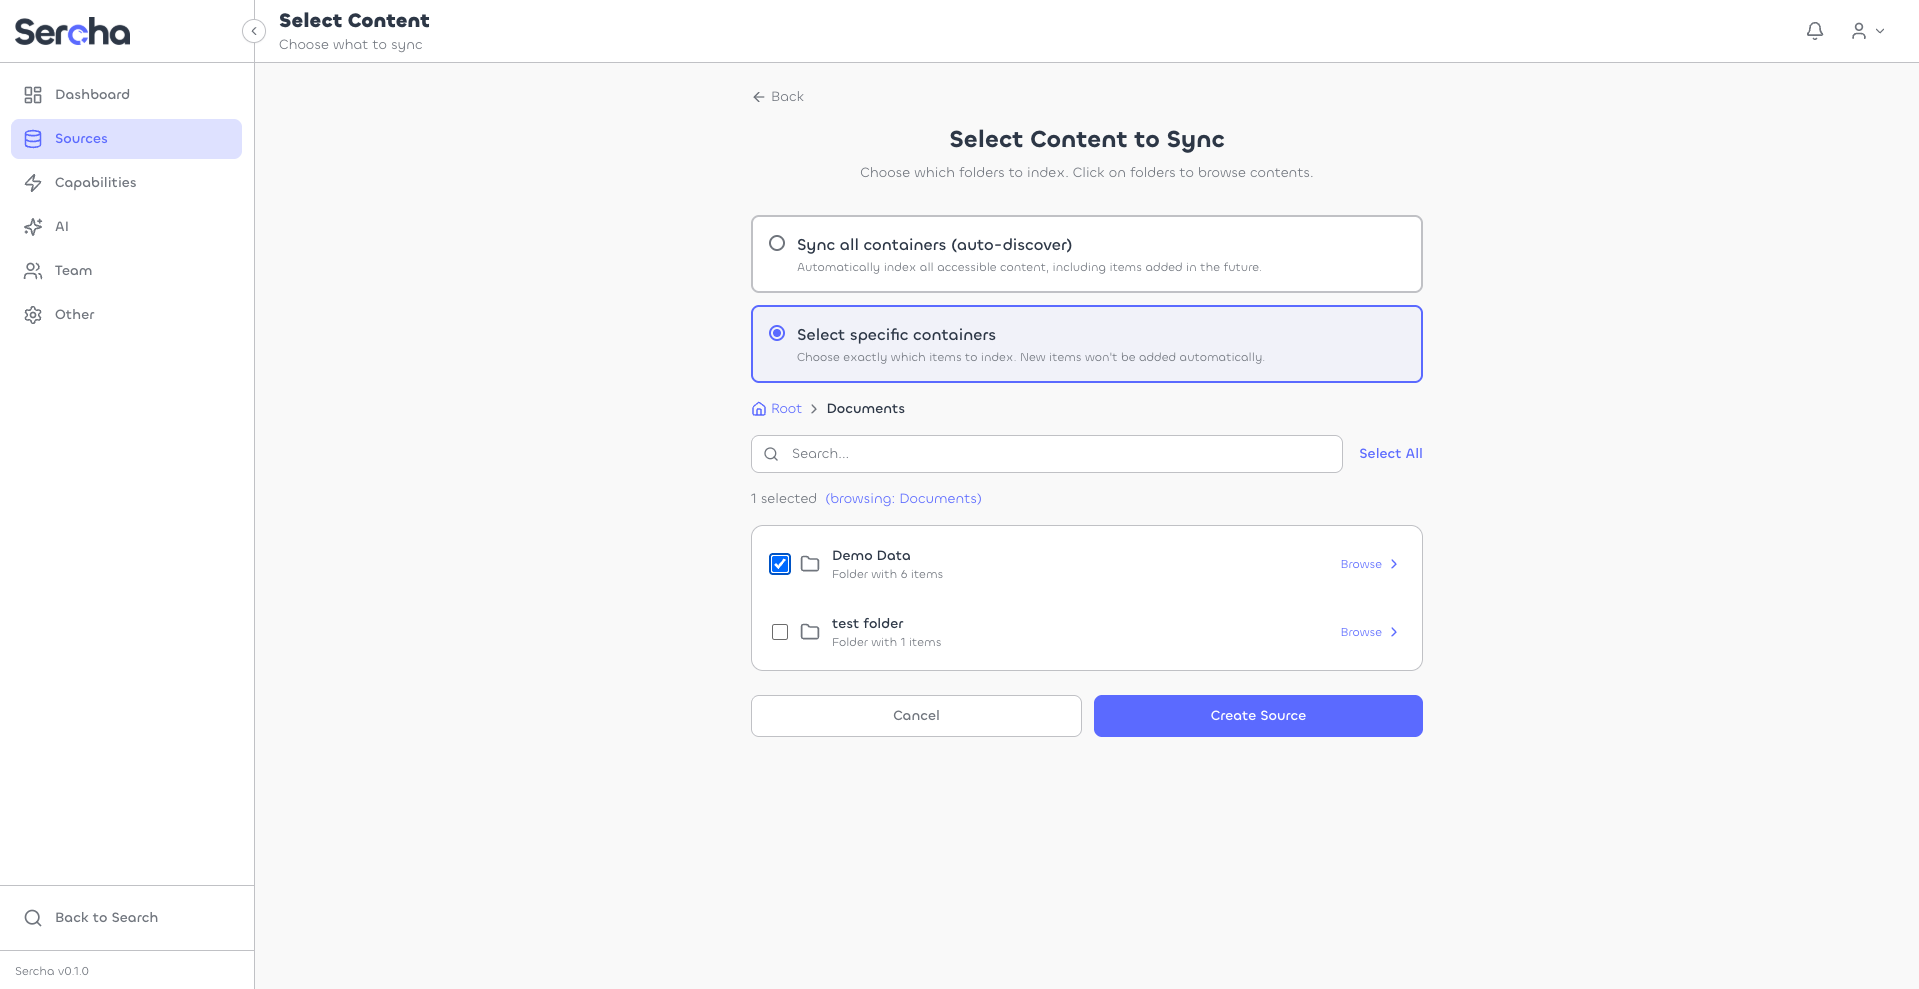
Selecting no folders (or the root) indexes everything you have access to. Pick specific folders if you want to keep the scope small during testing.
10. Trigger a sync
Click into your source, then click Sync Now to start indexing. Once the sync completes, you'll see the indexed documents listed on the page.
8. Get an auth token
If you haven't set up an account yet, create one via Initial Setup:
curl -X POST http://localhost:8080/api/v1/setup \
  -H "Content-Type: application/json" \
  -d '{
    "email": "admin@example.com",
    "password": "your-password",
    "name": "Admin"
  }'
Then log in to get a Bearer token:
curl -X POST http://localhost:8080/api/v1/auth/login \
  -H "Content-Type: application/json" \
  -d '{
    "email": "admin@example.com",
    "password": "your-password"
  }'
Export the token from the response:
export TOKEN=<paste token here>
9. Connect your OneDrive account
Start the OAuth flow via Authorize:
curl -X POST http://localhost:8080/api/v1/oauth/onedrive/authorize \
  -H "Authorization: Bearer $TOKEN"
Open the returned authorization_url in your browser. Microsoft shows a sign-in page, then a consent page — review the permissions and click Accept.
After authorization, Microsoft redirects to localhost:8080/api/v1/oauth/callback. The API processes the code exchange and creates a connection.
Verify the connection via List Connections:
curl http://localhost:8080/api/v1/connections \
  -H "Authorization: Bearer $TOKEN"
Save the connection id from the response.
10. Create a source
List available folders for the connection:
curl http://localhost:8080/api/v1/connections/{connection_id}/containers \
  -H "Authorization: Bearer $TOKEN"
Each container represents a folder. Container IDs use the format "folderID:folderName" — pass the full string back when creating the source. An empty containers array indexes all accessible content.
Create a source with the folders you want to index:
curl -X POST http://localhost:8080/api/v1/sources \
  -H "Authorization: Bearer $TOKEN" \
  -H "Content-Type: application/json" \
  -d '{
    "name": "My OneDrive",
    "provider_type": "onedrive",
    "connection_id": "{connection_id}",
    "containers": [
      {"id": "01ABCDEF...:Documents", "name": "Documents", "type": "folder"}
    ]
  }'
11. Trigger a sync
Trigger a sync to start indexing:
curl -X POST http://localhost:8080/api/v1/sources/{source_id}/sync \
  -H "Authorization: Bearer $TOKEN"
Check sync progress via Sync State:
curl http://localhost:8080/api/v1/sources/{source_id}/sync \
  -H "Authorization: Bearer $TOKEN"
What gets indexed
Scopes
The OAuth app requests Files.Read, User.Read, and offline_access. offline_access is required — Microsoft access tokens expire after one hour, and Sercha uses the refresh token to keep syncs running without re-prompting.
Only the signed-in user's own OneDrive is indexed. Files shared with the user (via "Shared with me") are not indexed by default.
Sync behavior
- Initial sync: Fetches all files from selected folders (or the entire drive if no folders are specified).
- Incremental sync: Uses Microsoft Graph delta queries — each sync returns only the items that changed since the last delta token, so incremental syncs are cheap even on large drives.
- Token refresh: Handled automatically. The 1-hour access-token expiry is invisible to you as long as the refresh token (granted by
offline_access) is valid. - Rate limiting: Microsoft Graph throttles aggressive clients; Sercha respects
Retry-Afterheaders and backs off automatically.
Delta queries mean Sercha doesn't have to refetch or re-hash files on every sync — Microsoft tells us exactly what changed. This scales well to drives with tens of thousands of files.